Spring : Swagger
Swagger
` Spring MVC에서 Swagger를 이용하여 Web API`를 명세화를 할 수 있습니다.
Swagger 설정하기
Group Id : org.apache.maven.archetypes, Artifact Id : maven-archetype-webapp 으로 Maven 프로젝트를 만듭니다.
Servlet 버전 설정하기
자바 어노테이션을 사용하기위해 Servlet 버전을 3.0이상으로 바꿔줍니다.
- web.xml 위쪽에 버전이 있는 부분을 삭제합니다.
1
2
3
4
<!--<!DOCTYPE web-app PUBLIC
 "-//Sun Microsystems, Inc.//DTD Web Application 2.3//EN"
 "http://java.sun.com/dtd/web-app_2_3.dtd" > 이 부분을 삭제-->
<?xml version="1.0" encoding="UTF-8"?> <!-- 이부분을 추가해줍니다. -->
Navigator -> .settings -> org.eclipse.wst.common.project.facet.core.xml에서jst.web부분의 버전을 원하는 버전으로 바꿔줍니다.Eclipse를 재시작합니다.
Pom.xml
1
2
3
4
5
6
7
8
9
10
11
12
13
14
15
16
17
18
19
20
21
22
23
24
25
26
27
28
29
30
31
32
33
34
35
36
37
38
39
40
41
42
43
44
45
46
47
48
49
50
51
52
53
54
55
56
57
58
59
60
61
62
63
64
65
66
67
68
69
70
71
72
73
74
75
76
77
78
79
80
81
82
83
84
85
86
87
88
89
90
91
92
93
94
95
96
97
98
99
100
101
102
103
104
105
106
107
108
109
110
111
112
113
114
115
116
117
118
119
120
121
122
123
124
125
126
127
128
129
130
131
132
133
134
135
136
137
138
139
140
141
142
143
144
145
146
147
148
149
150
151
152
153
154
<?xml version="1.0" encoding="UTF-8"?>

<project xmlns="http://maven.apache.org/POM/4.0.0" xmlns:xsi="http://www.w3.org/2001/XMLSchema-instance"
  xsi:schemaLocation="http://maven.apache.org/POM/4.0.0 http://maven.apache.org/xsd/maven-4.0.0.xsd">
  <modelVersion>4.0.0</modelVersion>

  <groupId>org.edwith.webbe</groupId>
  <artifactId>calculator</artifactId>
  <version>0.0.1-SNAPSHOT</version>
  <packaging>war</packaging>

  <name>calculator Maven Webapp</name>
  <!-- FIXME change it to the project's website -->
  <url>http://www.example.com</url>

  <properties>
    <project.build.sourceEncoding>UTF-8</project.build.sourceEncoding>
    <maven.compiler.source>1.8</maven.compiler.source>
    <maven.compiler.target>1.8</maven.compiler.target>
    <!-- Eclipse에서는 web.xml 파일을 작성하지 않고, Java Config를 사용할 때 failOnMissingWebXml를 false로 설정합니다. -->
     <failOnMissingWebXml>false</failOnMissingWebXml>
    <spring.version>5.2.3.RELEASE</spring.version>
  </properties>

  <dependencies>
     <!-- servlet-api이다. tomcat에 배포될 경우엔 사용되지 않도록 하기 위해서 scope를 provided로 설정하였습니다. -->
        <dependency>
            <groupId>javax.servlet</groupId>
            <artifactId>javax.servlet-api</artifactId>
            <version>3.1.0</version>
            <scope>provided</scope>
        </dependency>

        <!-- jsp-api이다. tomcat에 배포될 경우엔 사용되지 않도록 하기 위해서 scope를 provided로 설정하였습니다. -->
        <dependency>
            <groupId>javax.servlet.jsp</groupId>
            <artifactId>javax.servlet.jsp-api</artifactId>
            <version>2.3.2-b02</version>
            <scope>provided</scope>
        </dependency>

        <!-- jstl은 tomcat이 기본 지원하지 않습니다. 그렇기 때문에 tomcat에도 배포가 되야 합니다.-->
        <dependency>
            <groupId>javax.servlet</groupId>
            <artifactId>jstl</artifactId>
            <version>1.2</version>
        </dependency>

        <!-- spring webmvc에 대한 의존성을 추가합니다. spring webmvc에 대한 의존성을 추가하게 되면 spring-web, spring-core등이 자동으로 의존성이 추가됩니다.-->
        <dependency>
            <groupId>org.springframework</groupId>
            <artifactId>spring-webmvc</artifactId>
            <version>${spring.version}</version>
        </dependency>

        <!-- RestController의 json 변환을 위해 필요합니다 -->
  		<dependency>
            <groupId>com.fasterxml.jackson.core</groupId>
            <artifactId>jackson-core</artifactId>
            <version>2.9.8</version>
        </dependency>
        <dependency>
            <groupId>com.fasterxml.jackson.core</groupId>
            <artifactId>jackson-databind</artifactId>
            <version>2.9.8</version>
        </dependency>

        <!-- java 9 이상에서 추가해줘야 합니다. @PostConstruct 등을 사용하려면 필요합니다-->
        <dependency>
            <groupId>javax.annotation</groupId>
            <artifactId>javax.annotation-api</artifactId>
            <version>1.3.2</version>
        </dependency>

        <dependency>
            <groupId>junit</groupId>
            <artifactId>junit</artifactId>
            <version>4.12</version>
            <scope>test</scope>
        </dependency>

        <dependency>
            <groupId>org.springframework</groupId>
            <artifactId>spring-test</artifactId>
            <version>${spring.version}</version>
        </dependency>


        <!-- swagger2 의존성 추가
        Swagger 사용을 위해서는 구현체인 springfox-swagger2 가 필요하며,
        또 가장 중요한 (사용목적이라해도 과언이 아닌) UI 적으로 확인을 위해서는
        springfox-swagger-ui 이렇게 2개의 라이브러리가 필요하다.
        -->
        <dependency>
            <groupId>io.springfox</groupId>
            <artifactId>springfox-swagger2</artifactId>
            <version>2.6.1</version>
        </dependency>
        <dependency>
            <groupId>io.springfox</groupId>
            <artifactId>springfox-swagger-ui</artifactId>
            <version>2.6.1</version>
        </dependency>
  </dependencies>

  <build>
    <finalName>calculator</finalName>
    <pluginManagement><!-- lock down plugins versions to avoid using Maven defaults (may be moved to parent pom) -->
      <plugins>

      	<plugin>
            <artifactId>maven-compiler-plugin</artifactId>
            <version>3.7.0</version>
            <configuration>
                <source>1.8</source>
                <target>1.8</target>
                <encoding>utf-8</encoding>
            </configuration>
        </plugin>

        <plugin>
          <artifactId>maven-clean-plugin</artifactId>
          <version>3.1.0</version>
        </plugin>
        <!-- see http://maven.apache.org/ref/current/maven-core/default-bindings.html#Plugin_bindings_for_war_packaging -->
        <plugin>
          <artifactId>maven-resources-plugin</artifactId>
          <version>3.0.2</version>
        </plugin>
        <plugin>
          <artifactId>maven-compiler-plugin</artifactId>
          <version>3.8.0</version>
        </plugin>
        <plugin>
          <artifactId>maven-surefire-plugin</artifactId>
          <version>2.22.1</version>
        </plugin>
        <plugin>
          <artifactId>maven-war-plugin</artifactId>
          <version>3.2.2</version>
        </plugin>
        <plugin>
          <artifactId>maven-install-plugin</artifactId>
          <version>2.5.2</version>
        </plugin>
        <plugin>
          <artifactId>maven-deploy-plugin</artifactId>
          <version>2.8.2</version>
        </plugin>
      </plugins>
    </pluginManagement>
  </build>
</project>
WebAppInitializer.java
자바 웹 어플리케이션을 만들 때는 web.xml 파일이나 WebApplicationInitializer를 구현한 클래스를 만들어야 합니다. WebApplicationInitializer를 구현하고 있는 AbstractAnnotationConfigDispatcherServletInitializer를 상속받아 작성할 수 있습니다.
AbstractAnnotationConfigDispatcherServletInitializer 클래스는 WebApplicationInitializer를 구현하고 있으면서 필요한 부분만 오버라이딩 하여 구현하도록 제공하는 클래스입니다.
1
2
3
4
5
6
7
8
9
10
11
12
13
14
15
16
17
18
19
20
21
22
23
24
25
26
27
28
29
30
31
32
33
34
35
36
37
38
39
40
package org.edwith.webbe.calculator.config;

import org.springframework.web.filter.CharacterEncodingFilter;
import org.springframework.web.servlet.support.AbstractAnnotationConfigDispatcherServletInitializer;

import javax.servlet.*;

public class WebAppInitializer extends AbstractAnnotationConfigDispatcherServletInitializer {
	// ApplicationConfig.class를 Spring 기본 설정파일 클래스로 지정합니다.
    @Override
    protected Class<?>[] getRootConfigClasses() {
        return new Class<?>[]{ApplicationConfig.class};
    }

    // MvcConfig.class를 Spring MVC 설정 파일 클래스로 지정합니다.
    @Override
    protected Class<?>[] getServletConfigClasses() {
        return new Class<?>[]{MvcConfig.class};
    }

    /*
    DispatcherServlet이 동작할 맵핑정보를 설정합니다.
	"/"를 설정한다는 것은 모든 요청을 DispatcherServlet이 처리한다는 것을 의미합니다.
     */
    @Override
    protected String[] getServletMappings() {
        return new String[]{"/"};
    }

    /*
    필터를 설정합니다. 여기에서는 인코딩 필터를 설정하고 있습니다.
     */
    @Override
    protected Filter[] getServletFilters() {
        CharacterEncodingFilter encodingFilter = new CharacterEncodingFilter();
        encodingFilter.setEncoding("UTF-8");

        return new Filter[]{encodingFilter};
    }
}
Spring 기본 설정 파일(ApplicationConfig.java)
Spring MVC에서 사용할 Bean들을 설정하는 스프링 설정 파일을 작성합니다. 여기에서는 org.edwith.webbe.calculator.ser 패키지 이하의 Bean들만 찾도록 설정되어 있습니다.
1
2
3
4
5
6
7
8
9
package org.edwith.webbe.calculator.config;

import org.springframework.context.annotation.ComponentScan;
import org.springframework.context.annotation.Configuration;

@Configuration
@ComponentScan(basePackages = {"org.edwith.webbe.calculator.service"})
public class ApplicationConfig {
}
Spring MVC 설정 파일(MvcConfig.java)
1
2
3
4
5
6
7
8
9
10
11
12
13
14
15
16
17
18
19
20
21
22
23
24
25
26
27
28
29
30
31
32
33
34
35
36
37
38
39
40
41
42
43
44
45
46
47
48
49
50
51
52
53
54
55
56
57
58
59
60
61
package org.edwith.webbe.calculator.config;

import org.springframework.context.annotation.Bean;
import org.springframework.context.annotation.ComponentScan;
import org.springframework.context.annotation.Configuration;
import org.springframework.web.servlet.config.annotation.DefaultServletHandlerConfigurer;
import org.springframework.web.servlet.config.annotation.EnableWebMvc;
import org.springframework.web.servlet.config.annotation.WebMvcConfigurer;

import springfox.documentation.builders.PathSelectors;
import springfox.documentation.builders.RequestHandlerSelectors;
import springfox.documentation.service.ApiInfo;
import springfox.documentation.service.Contact;
import springfox.documentation.spi.DocumentationType;
import springfox.documentation.spring.web.plugins.Docket;
import springfox.documentation.swagger2.annotations.EnableSwagger2;

@Configuration
@EnableWebMvc
@EnableSwagger2
@ComponentScan(basePackages = {"org.edwith.webbe.calculator.controller"})
public class MvcConfig implements WebMvcConfigurer {
		/*
		 * DefaultServlet에 대한 설정을 합니다.
		 * DispatcherServlet이 처리하지 못하는 URL은 DefaultServlet이 처리하게 됩니다.
		 * 해당 설정이 없으면 자동 생성된 Swaager 페이지를 볼 수 없습니다.
		 */
		@Override
		public void configureDefaultServletHandling(DefaultServletHandlerConfigurer configurer) {
			configurer.enable();
		}

		/*
	    	Swagger 사용 시에는 Docket Bean 을 품고있는 설정 클래스 1개가 기본으로 필요합니다.
	    	Spring Boot 에서는 이 기본적인 설정파일 1개로 Swagger 와 Swagger UI 를 함께 사용가능하지만,
	    	Spring MVC 의 경우 Swagger UI 를 위한 별도의 설정이 필요합니다.
	    	이는, Swagger UI 를 ResourceHandler 에 수동으로 등록해야 하는 작업인데,
	    	Spring Boot 에서는 이를 자동으로 설정해주지만 Spring MVC 에서는 그렇지 않기 때문입니다.
	     */
		@Bean
		public Docket api() {
			return new Docket(DocumentationType.SWAGGER_2)
					.select()
					.apis(RequestHandlerSelectors.any()) // 현재 RequestMapping으로 할당된 모든 URL 리스트를 추출
					.paths(PathSelectors.ant("/api/**")) // PathSelectors.any() 를 할경우 모든 경로가 다 사용된다. RestController가 아닌 것 까지 사용된다.
					.build()
					.apiInfo(apiInfo())
					.useDefaultResponseMessages(false);
		}

		/**
		 * API Info
		 */
		private ApiInfo apiInfo() {
			Contact contact = new Contact("강경미", "https://www.edwith.org", "carami@edwith.org");
			ApiInfo apiInfo =
					new ApiInfo("Swagger Sample", "APIs Sample", "Sample Doc 0.1v", "", contact, "This sentence will be display.", "/");
			return apiInfo;
		}
}
클래스 위에 @EnableWebMvc, @EnableSwagger2가 붙어 있는 것을 확인할 수 있습니다. 각각 Spring MVC설정, Swagger2설정이라는 것을 의미합니다. 해당 어노테이션이 붙어 있을 경우 Spring MVC와 Swagger2의 기본 설정이 자동으로 설정 됩니다.
Swagger2를 사용하려면 Docket객체를 Bean으로 설정해야 합니다. Docker객체에는 어떤 경로의 Web API들을 자동으로 문서화 할 것인지에 대한 설정과 문서 설명에 대한 내용이 포함됩니다.
여기까지 설정하였다면, Web API를 작성하고 스웨거를 이용할 준비가 완료되었습니다.
테스트할 Web API 만들기
덧셈, 뺄셈을 하는 기능을 가진 Web API를 추가하고 Swagger를 이용해 자동으로 생성된 명세를 확인하고 테스트할 수 있습니다.
Web API 클래스 작성하기
다음과 같은 기능을 가진 Web API를 작성해보도록 하겠습니다.

CalculatorService.java
덧셈, 뺄셈 기능을 가진 CalculatorService클래스를 작성합니다.
1
2
3
4
5
6
7
8
9
10
11
12
13
14
package org.edwith.webbe.calculator.service;

import org.springframework.stereotype.Service;

@Service
public class CalculatorService {
    public int plus(int value1, int value2){
        return value1 + value2;
    }

    public int minus(int value1, int value2){
        return value1 - value2;
    }
}
CalculatorService클래스는 컴포넌트 스캔을 통해 자동으로 Bean으로 등록됩니다.
CalculatorResult.java
결과값을 표현하는 CalculatorResult클래스입니다.
1
2
3
4
5
6
7
8
9
10
11
12
13
14
15
16
17
18
19
20
21
22
23
24
25
26
27
28
29
30
31
32
33
34
35
36
37
38
39
40
41
42
43
44
package org.edwith.webbe.calculator.dto;

public class CalculatorResult {
    // 아래의 상수값은 enum으로 변경 가능하다.
    public static final String PLUS_OPERATION = "+";
    public static final String MINUS_OPERATION = "-";

    private int value1;
    private int value2;
    private String operation;
    private int result;

    public int getValue1() {
        return value1;
    }

    public void setValue1(int value1) {
        this.value1 = value1;
    }

    public int getValue2() {
        return value2;
    }

    public void setValue2(int value2) {
        this.value2 = value2;
    }

    public String getOperation() {
        return operation;
    }

    public void setOperation(String operation) {
        this.operation = operation;
    }

    public int getResult() {
        return result;
    }

    public void setResult(int result) {
        this.result = result;
    }
}
CalculatorApiController.java
1
2
3
4
5
6
7
8
9
10
11
12
13
14
15
16
17
18
19
20
21
22
23
24
25
26
27
28
29
30
31
32
33
34
35
36
37
38
39
40
41
42
43
44
45
46
package org.edwith.webbe.calculator.controller.api;

import io.swagger.annotations.*;
import org.edwith.webbe.calculator.dto.CalculatorResult;
import org.edwith.webbe.calculator.service.CalculatorService;
import org.springframework.beans.factory.annotation.Autowired;
import org.springframework.web.bind.annotation.*;

import java.util.List;

@RestController
@RequestMapping(path = "/api/calculator")
public class CalculatorApiController {
    @Autowired
    private CalculatorService calculatorService;

    @ApiOperation(value = "덧셈 구하기")
    @ApiResponses({  // Response Message에 대한 Swagger 설명
            @ApiResponse(code = 200, message = "OK"),
            @ApiResponse(code = 500, message = "Exception")
    })
    @GetMapping("/plus")
    public CalculatorResult plus(@RequestParam("value1")int value1, @RequestParam("value2") int value2){
        CalculatorResult calculatorResult = new CalculatorResult();
        calculatorResult.setValue1(value1);
        calculatorResult.setValue2(value2);
        calculatorResult.setOperation(CalculatorResult.PLUS_OPERATION);
        calculatorResult.setResult(calculatorService.plus(value1, value2));
        return calculatorResult;
    }

    @ApiOperation(value = "덧셈 구하기")
    @ApiResponses({  // Response Message에 대한 Swagger 설명
            @ApiResponse(code = 200, message = "OK"),
            @ApiResponse(code = 500, message = "Exception")
    })
    @GetMapping("/minus")
    public CalculatorResult minus(@RequestParam("value1")int value1, @RequestParam("value2") int value2){
        CalculatorResult calculatorResult = new CalculatorResult();
        calculatorResult.setValue1(value1);
        calculatorResult.setValue2(value2);
        calculatorResult.setOperation(CalculatorResult.MINUS_OPERATION);
        calculatorResult.setResult(calculatorService.minus(value1, value2));
        return calculatorResult;
    }
}
응답 결과를 JSON으로 하기 위해서 @RestController 어노테이션을 클래스 위에 붙여줍니다.
PATH가 공통적으로 "/api/calculator"로 하기 위해서 클래스 위에 @RequestMapping(path = "/api/calculator") 를 붙여주었습니다.
@ApiOperation과 @ApiResponse는 스웨거가 제공하는 어노테이션입니다.@ApiOperation은 Web API의 간단한 설명을 적어줄 때 사용합니다.
아래는 덧셈 구하기라는 설명을 표현하고 있습니다.
1
@ApiOperation(value = "덧셈 구하기")
@ApiResponse는 응답 메시지에 대한 명세를 위해 사용합니다. HTTP 응답 코드에 따라서 어떤 결과를 나타내는지 설명하고 있습니다.
200 응답 코드일 경우에는 OK를, 500 응답 코드일 경우에는 Exception인 것을 표현합니다.
1
2
3
4
@ApiResponses({  // Response Message에 대한 Swagger 설명
            @ApiResponse(code = 200, message = "OK"),
            @ApiResponse(code = 500, message = "Exception")
    })
Web API 실행하기
Context Root경로를 /calculator로 지정하고 웹 어플리케이션을 실행합니다. 웹 어플리케이션을 실행한 후 브라우저에서 http://localhost:8080/calculator/api/calculator/plus?value1=5&value2=10 URL을 입력합니다.
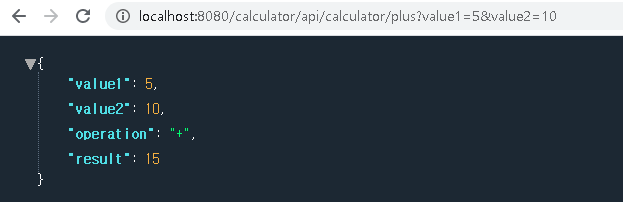
실행 결과가 위와 같이 출력되는 것을 확인할 수 있습니다. (브라우저에 따라서, 브라우저 확장 프로그램에 어떤 프로그램이 설치되어 있느냐에 따라서 결과 화면이 다르게 보여질 수 있습니다.)
자동 생성된 스웨거 화면 확인하기
브라우저에서 http://localhost:8080/calculator/swagger-ui.html을입력하면 다음과 같은 화면이 보여집니다.
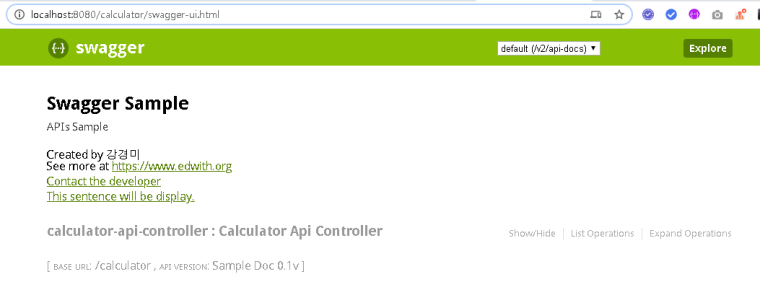
calculator-api-controller(회색 부분)을 클릭합니다.
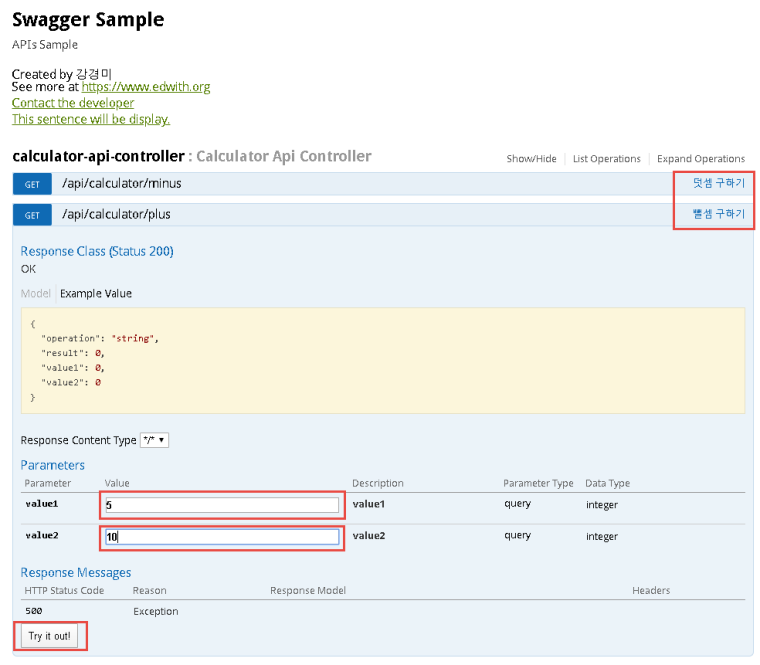
우측을 보면 덧셈 구하기, 뺄셈 구하기라고 표시되는 것을 확인할 수 있습니다. @ApiOperation 어노테이션으로 설정한 값인 것을 알 수 있습니다. 덧셈구하기나 뺄셈구하기를 선택하고, value1과 value2부분에 값을 입력하고 아래 부분의 Try it out! 버튼을 클릭하세요.
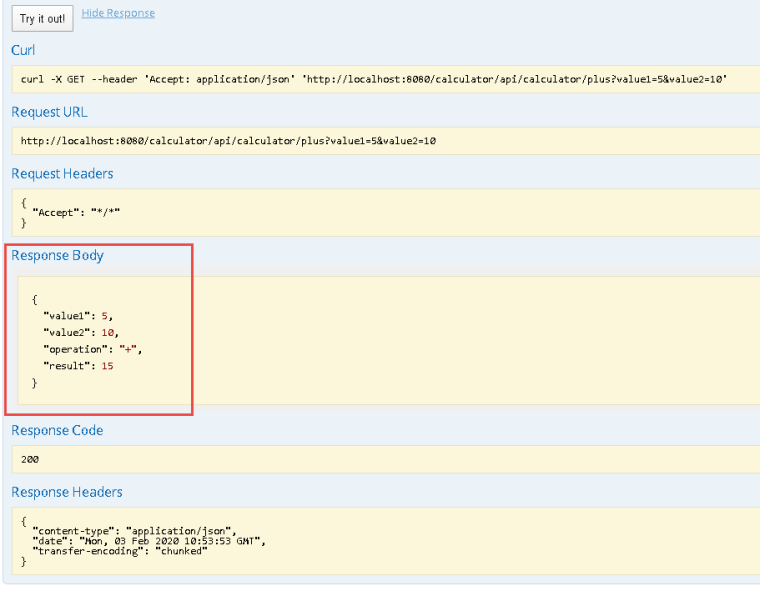
위의 결과는 덧셈 구하기를 선택한 후, value1과 value2에 각각 5와 10을 설정한 후 Try it out!버튼을 클릭했을 때 나오는 결과 화면입니다. 응답 내용(Response Body)에 value1, value2, operation, result값이 출력되는 것을 확인할 수 있습니다.
Swagger 오류
다른 곳에서는 제대로 작동하지만 Swagger에서 아래와 같은 오류가 발생할 경우가 있습니다.
1
2
3
{
  "error": "no response from server"
}
이 경우는 버전의 문제이기 때문에 Swagger의 버전을 2.9.2이상으로 바꾸어주면 됩니다.
참고 : https://www.boostcourse.org/web326/lecture/58990/?isDesc=false
https://www.boostcourse.org/web326/lecture/58989/?isDesc=false