
Spring : MVC 예제(DispatcherServlet을 FrontController로 설정하기)
MVC 예제(DispatcherServlet을 FrontController로 설정하기)
DispatcherServlet을 FrontController로 설정하기
DispatcherServlet이 FrontController이라고 했는데, 설정을 해주지 않으면 DispatcherServlet은 FrontController의 역할을 할 수 없습니다. 그렇기 때문에 반드시 설정을 해주어야 합니다.
web.xml파일에 설정javax.servlet.ServletContainerInitializer사용 - 서블릿 3.0 스펙 이상에서 web.xml파일을 대신해서 사용할 수 있습니다.org.springframework.web.WebApplicationInitializer인터페이스를 구현해서 사용
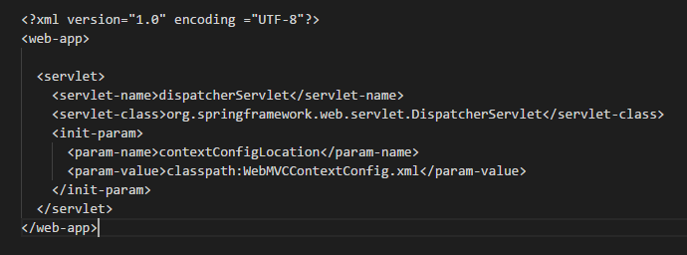
web.xml파일에서 DispatcherServlet 설정하기
xml spring 설정 읽어들이도록 DispathcerServlet설정
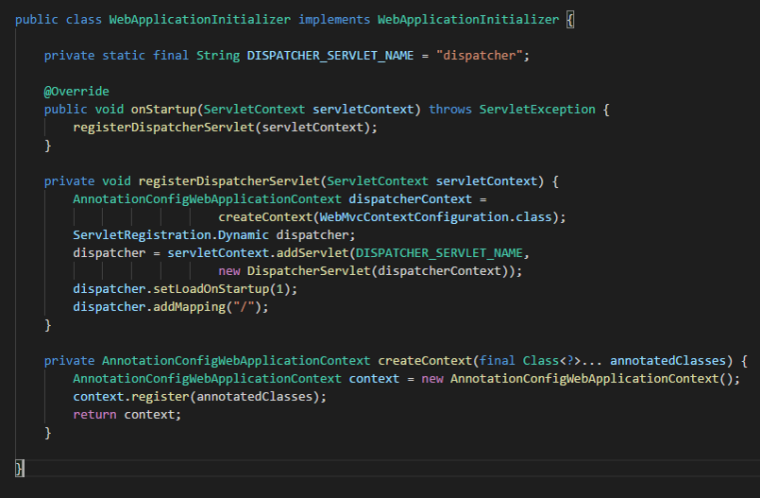
Java config spring 설정 읽어들이도록 DispathcerServlet설정

WebApplicationInitializer를 구현해서 설정하기
Spring MVC는 ServletContainerInitializer를 구현하고 있는 SpringServletContainerInitializer를 제공합니다. SpringServletContainerInitializer는 WebApplicationInitializer 구현체를 찾아 인스턴스를 만들고 해당 인스턴스의 onStartup 메소드를 호출하여 초기화합니다.
Spring MVC 설정
kr.or.connect.webmvc.config.WebMvcContextConfiguration

사용되는 어노테이션
@Configuration
org.springframework.context.annotation의 Configuration 어노테이션과 Bean 어노테이션 코드를 이용하여 스프링 컨테이너에 새로운 Bean 객체를 제공할 수 있습니다.
@EnableWebMvc
DispatcherServlet의 RequestMappingHandlerMapping, RequestMappingHandlerAdapter, ExceptionHandlerExceptionResolver, MessageConverter 등 Web에 필요한 Bean들을 대부분 자동으로 설정해줍니다.
xml로 설정의
기본 설정 이외의 설정이 필요하다면 WebMvcConfigurerAdapter 를 상속받도록 Java config class를 작성한 후, 필요한 메소드를 오버라이딩 하도록 한다.
WebMvcConfigurerAdapter
org.springframework.web.servlet.config.annotation. WebMvcConfigurerAdapter 입니다. @EnableWebMvc 를 이용하면 기본적인 설정이 모두 자동으로 되지만, 기본 설정 이외의 설정이 필요할 경우 해당 클래스를 상속 받은 후, 메소드를 오버라이딩 하여 구현합니다.
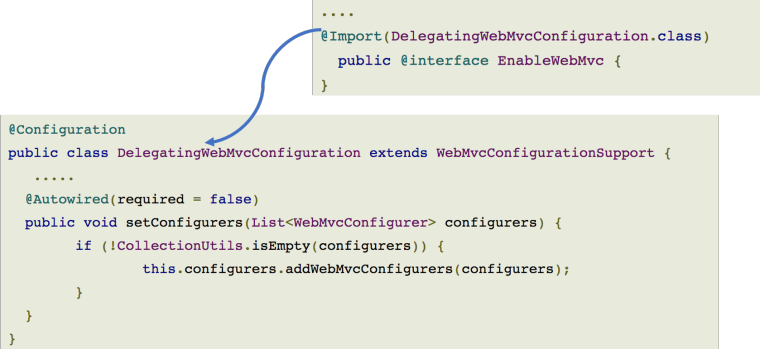
WebMvcConfigurationSupport
조금 더 깊게 알고 싶다면 EnableWebMVC에 대한 소스코드를 살펴볼 수가 있습니다.
WebMvcConfigurationSupport에 대해 자세히 알고 싶다면 아래의 주소에서 코드를 볼 수 있습니다.
https://github.com/spring-projects/spring-framework/blob/master/spring-webmvc/src/main/java/org/springframework/web/servlet/config/annotation/WebMvcConfigurationSupport.java
@ComponentScan
ComponentScan어노테이션을 이용하면 Controller, Service, Repository, Component어노테이션이 붙은 클래스를 찾아 스프링 컨테이너가 관리하게 됩니다.
DefaultAnnotationHandlerMapping, RequestMappingHandlerMapping
DefaultAnnotationHandlerMapping과 RequestMappingHandlerMapping의 구현체는 다른 핸들러 매핑보다 훨씬 더 정교한 작업을 수행합니다. 이 두 개의 구현체는 어노테이션을 사용해 매핑 관계를 찾는 매우 강력한 기능을 가지고 있습니다. 이들 구현체는 스프링 컨테이너 즉 어플리케이션 컨텍스트에 있는 요청 처리 Bean에서 RequestMapping어노테이션을 클래스나 메소드에서 찾아 HandlerMapping객체를 생성하게 됩니다.
HandlerMapping은 서버로 들어온 요청을 어느 핸들러로 전달할지 결정하는 역할을 수행합니다.
DefaultAnnotationHandlerMapping은 DispatcherServlet이 기본으로 등록하는 기본 핸들러 맵핑 객체이고, RequestMappingHandlerMapping은 더 강력하고 유연하지만 사용하려면 명시적으로 설정해야 합니다.
Controller(Handler) 클래스
@Controller 어노테이션을 클래스 위에 붙입니다. 맵핑을 위해 @RequestMapping 애노테이션을 클래스나 메소드에서 사용합니다.
@RequestMapping
- Http 요청과 이를 다루기 위한 Controller 의 메소드를 연결하는 어노테이션
- Http Method 와 연결하는 방법
- @RequestMapping(value=”/users”, method=RequestMethod.POST)
- From Spring 4.3 version (@GetMapping, @PostMapping, @PutMapping, @DeleteMapping, @PatchMapping)
- Http 특정 해더와 연결하는 방법
- @RequestMapping(method = RequestMethod.GET, headers = “content-type=application/json”)
- Http Parameter 와 연결하는 방법
- @RequestMapping(method = RequestMethod.GET, params = “type=raw”)
- Content-Type Header 와 연결하는 방법
- @RequestMapping(method = RequestMethod.GET, consumes = “application/json”)
- Accept Header 와 연결하는 방법
- @RequestMapping(method = RequestMethod.GET, produces = “application/json”)
예제 코드
pom.xml
<?xml version="1.0" encoding="UTF-8"?>

<project xmlns="http://maven.apache.org/POM/4.0.0" xmlns:xsi="http://www.w3.org/2001/XMLSchema-instance"
  xsi:schemaLocation="http://maven.apache.org/POM/4.0.0 http://maven.apache.org/xsd/maven-4.0.0.xsd">
  <modelVersion>4.0.0</modelVersion>

  <groupId>kr.or.connect</groupId>
  <artifactId>mvcexam</artifactId>
  <version>0.0.1-SNAPSHOT</version>
  <packaging>war</packaging>

  <name>mvcexam Maven Webapp</name>
  <!-- FIXME change it to the project's website -->
  <url>http://www.example.com</url>

  <properties>
    <project.build.sourceEncoding>UTF-8</project.build.sourceEncoding>
    <maven.compiler.source>1.8</maven.compiler.source>
    <maven.compiler.target>1.8</maven.compiler.target>
    <spring.version>4.3.5.RELEASE</spring.version>
  </properties>

  <dependencies>
    <dependency>
      <groupId>junit</groupId>
      <artifactId>junit</artifactId>
      <version>4.11</version>
      <scope>test</scope>
    </dependency>

    <!-- https://mvnrepository.com/artifact/org.springframework/spring-context -->
	<dependency>
	    <groupId>org.springframework</groupId>
	    <artifactId>spring-context</artifactId>
	    <version>${spring.version}</version>
	</dependency>

	<!-- https://mvnrepository.com/artifact/org.springframework/spring-webmvc -->
	<dependency>
	    <groupId>org.springframework</groupId>
	    <artifactId>spring-webmvc</artifactId>
	    <version>${spring.version}</version>
	</dependency>


    <!-- https://mvnrepository.com/artifact/javax.servlet/javax.servlet-api -->
	<dependency>
	    <groupId>javax.servlet</groupId>
	    <artifactId>javax.servlet-api</artifactId>
	    <version>3.1.0</version>
	    <scope>provided</scope>
	</dependency>

	<!-- https://mvnrepository.com/artifact/javax.servlet.jsp/javax.servlet.jsp-api -->
	<dependency>
	    <groupId>javax.servlet.jsp</groupId>
	    <artifactId>javax.servlet.jsp-api</artifactId>
	    <version>2.3.1</version>
	    <scope>provided</scope>
	</dependency>


    <!-- https://mvnrepository.com/artifact/jstl/jstl -->
	<dependency>
	    <groupId>jstl</groupId>
	    <artifactId>jstl</artifactId>
	    <version>1.2</version>
	</dependency>


  </dependencies>

  <build>
    <finalName>mvcexam</finalName>
    <pluginManagement><!-- lock down plugins versions to avoid using Maven defaults (may be moved to parent pom) -->
      <plugins>

      	<!-- plugin -->
      	<plugin>
			<groupId>org.apache.maven.plugins</groupId>
			<artifactId>maven-compiler-plugin</artifactId>
			<version>3.6.1</version>
			<configuration>
				<source>1.8</source>
				<target>1.8</target>
			</configuration>
		</plugin>

        <plugin>
          <artifactId>maven-clean-plugin</artifactId>
          <version>3.1.0</version>
        </plugin>
        <!-- see http://maven.apache.org/ref/current/maven-core/default-bindings.html#Plugin_bindings_for_war_packaging -->
        <plugin>
          <artifactId>maven-resources-plugin</artifactId>
          <version>3.0.2</version>
        </plugin>
        <plugin>
          <artifactId>maven-compiler-plugin</artifactId>
          <version>3.8.0</version>
        </plugin>
        <plugin>
          <artifactId>maven-surefire-plugin</artifactId>
          <version>2.22.1</version>
        </plugin>
        <plugin>
          <artifactId>maven-war-plugin</artifactId>
          <version>3.2.2</version>
        </plugin>
        <plugin>
          <artifactId>maven-install-plugin</artifactId>
          <version>2.5.2</version>
        </plugin>
        <plugin>
          <artifactId>maven-deploy-plugin</artifactId>
          <version>2.8.2</version>
        </plugin>
      </plugins>
    </pluginManagement>
  </build>
</project>
web.xml
<!DOCTYPE web-app PUBLIC
 "-//Sun Microsystems, Inc.//DTD Web Application 2.3//EN"
 "http://java.sun.com/dtd/web-app_2_3.dtd" >

<web-app>
  <display-name>Archetype Created Web Application</display-name>

    <servlet>
    <servlet-name>mvc</servlet-name>
    <!-- Spring이 제공하고 있는 DispatcherServlet을 FrontController로 할 것이라는 <servlet-class>가 등록되어 있습니다. -->
    <servlet-class>org.springframework.web.servlet.DispatcherServlet</servlet-class>
    <init-param>
      <param-name>contextClass</param-name>
      <!-- DispatcherServlet이 실행될 때 AnnotationConfigWebApplicationContext를 사용하기 위해 등록되어 있습니다. -->
      <param-value>org.springframework.web.context.support.AnnotationConfigWebApplicationContext</param-value>
    </init-param>
    <init-param>
      <param-name>contextConfigLocation</param-name>
      <!-- DispatcherServlet이 실행될 때 설정들을 읽어야 하기 때문에 -->
      <!-- <init-param>부분에 우리가 만든 WebMvcContextConfiguration를 설정하고 있는 것을 볼 수 있습니다. -->
      <param-value>kr.or.connect.mvcexam.config.WebMvcContextConfiguration</param-value>
    </init-param>
    <!-- 프로그램 시작과 동시에 서블릿의 생성과 초기화를 진행할 때 사용합니다. -->
    <!-- 여러 서블릿들간에 우선순위가 필요한 경우 0에 가까울수록 먼저 초기화가 진행됩니다. -->
    <load-on-startup>1</load-on-startup>
  </servlet>
  <servlet-mapping>
    <servlet-name>mvc</servlet-name>
    <url-pattern>/</url-pattern>
    <!-- "/"요청이 들어오면 <servlet>안에 있는 <servlet-name>이 "mvc"인 이름을 찾아갑니다. -->
  </servlet-mapping>

</web-app>
WebMvcContextConfiguration.java
package kr.or.connect.mvcexam.config;

import org.springframework.context.annotation.Bean;
import org.springframework.context.annotation.ComponentScan;
import org.springframework.context.annotation.Configuration;
import org.springframework.web.servlet.config.annotation.DefaultServletHandlerConfigurer;
import org.springframework.web.servlet.config.annotation.EnableWebMvc;
import org.springframework.web.servlet.config.annotation.ResourceHandlerRegistry;
import org.springframework.web.servlet.config.annotation.ViewControllerRegistry;
import org.springframework.web.servlet.config.annotation.WebMvcConfigurerAdapter;
import org.springframework.web.servlet.view.InternalResourceViewResolver;

@Configuration
@EnableWebMvc
@ComponentScan(basePackages = {"kr.or.connect.mvcexam.controller"})
public class WebMvcContextConfiguration extends WebMvcConfigurerAdapter {

	// "web.xml" url을 "/"로 바꿔주면서 모든 요청이 들어왔을 때 서블릿을 실행해주게 됩니다.
	// 이 때, 컨트롤러의 URL에 매핑되어있는 요청만 들어오는 게 아니라CSS,이미지,자바스크립트 등등의 모든 요청들을 다 받아옵니다.
	// 이 부분이 없다면 모두 컨트롤러가 가진 "RequestMapping"에서 찾으려고 하면서 오류를 발생시킵니다.
	// 그렇기 때문에 이 부분은 반드시 필요한 부분입니다.
	@Override
    public void addResourceHandlers(ResourceHandlerRegistry registry) {
		// "addResourceHandler("/css/**")" -> "/css/**" 이렇게 시작하는 url요청은
		// "addResourceLocations("/css/")" -> 어플리케이션 루트 디렉터리 아래에 있는 "/css/"에서 찾게 해주는 메서드 입니다.
        registry.addResourceHandler("/assets/**").addResourceLocations("classpath:/META-INF/resources/webjars/").setCachePeriod(31556926);
        registry.addResourceHandler("/css/**").addResourceLocations("/css/").setCachePeriod(31556926);
        registry.addResourceHandler("/img/**").addResourceLocations("/img/").setCachePeriod(31556926);
        registry.addResourceHandler("/js/**").addResourceLocations("/js/").setCachePeriod(31556926);
    }


	// 매핑 정보가 없는 URL요청은 Spring의 "DefaultServletHttpRequestHandler"가 처리하도록 해줍니다.
	// 그 다음 "DefaultServletHttpRequestHandler"는 WAS의 DefaultServlet에게 해당일을 넘기게 됩니다.
	// 그러면 WAS는 DefaultServlet이 static한 자원을 읽어서 보여주게 하는 것입니다.
    @Override
    public void configureDefaultServletHandling(DefaultServletHandlerConfigurer configurer) {
    	// "DefaultServletHandlerConfigurer" 객체의 "enable()" 메서드를 호출함으로써
    	// "DefaultServletHandler"를 사용하도록 해줍니다.
    	configurer.enable();
    }

    // 컨트롤러 클래스를 작성하지 않고도 매핑할 수 있도록 해주는 메서드 입니다.

    // 하지만 프로젝트가 만들어질 때 자동으로 만들었던 index.jsp파일이 있다면
    // 웹 어플리케이션 자체가 주소가 없었을 때 index로 시작되는 파일을 찾는 설정을 가지고 있기 때문에
    // main이 실행되지 않는 것을 볼 수 있습니다.
    // 이 때는 파일의 이름이 index가 아니거나 없거나 다른 위치에 있다면 index.jsp를 찾지 않습니다.
    @Override
    public void addViewControllers(final ViewControllerRegistry registry) {
    		System.out.println("addViewControllers가 호출됩니다. ");
    		// "/"요청이 들어오면 "main"이라는 이름의 뷰로 보여주도록 합니다.
    		// "main"이라는 이름만 가지고서는 뷰 정보를 찾아낼 수 없기 때문에
    		// 아래의 "getInternalResourceViewResolver"라는 메서드에서 설정된 형태로 뷰를 사용하게 됩니다.
        registry.addViewController("/").setViewName("main");
    }

    @Bean
    public InternalResourceViewResolver getInternalResourceViewResolver() {
        InternalResourceViewResolver resolver = new InternalResourceViewResolver();
        // resolver의 Prefix는 이름 앞쪽에, Suffix는 이름 뒤쪽에다 붙여 줍니다.
        // 그러면 뷰 정보는 "/WEB-INF/views/main.jsp"가 되는 것입니다.
        // 위의 메서드가 실행되려면 "/WEB-INF/views/main.jsp"가 존재해야 합니다.
        resolver.setPrefix("/WEB-INF/views/");
        resolver.setSuffix(".jsp");
        return resolver;
    }
}
main.jsp
<%@ page language="java" contentType="text/html; charset=UTF-8"
    pageEncoding="UTF-8"%>
<!DOCTYPE html PUBLIC "-//W3C//DTD HTML 4.01 Transitional//EN" "http://www.w3.org/TR/html4/loose.dtd">
<html>
<head>
<meta http-equiv="Content-Type" content="text/html; charset=UTF-8">
<title>Insert title here</title>
</head>
<body>
<h1>main page~~~!!</h1>
</body>
</html>
참고 : https://www.boostcourse.org/web326/lecture/258535?isDesc=false
댓글남기기