
Spring : Spring Security
Spring Security
웹 어플리케이션을 사용하다 보면 한번쯤은 로그인, 로그아웃을 하게 됩니다. 이렇게 아이디와 암호를 이용해서 로그인 하는 과정을 인증(Authentication)이라고 합니다. 네이버 카페를 사용해보면 로그인을 했다 하더라도, 특정 카페는 회원가입을 하고 어느정도 이상의 등급이 되지 않을 경우 이용을 못하기도 합니다. 이 부분을 인가(Authorization)라고 합니다.
스프링 시큐리티(Spring Security)를 사용하면 편리하게 인증/인가를 구현할 수 있습니다.
스프링 시큐리티(Spring Security)란?
스프링 시큐리티는 스프링 기반의 어플리케이션의 보안(인증과 권한)을 담당하는 프레임워크를 말합니다. 만약 스프링 시큐리티를 사용하지 않았다면, 자체적으로 세션을 체크하고 리다이렉트 등을 해야 할 것입니다.
-
스프링 시큐리티는 보안과 관련해서 체계적으로 많은 옵션들을 지원해줍니다.
-
스프링 시큐리티는 필터(Filter) 기반으로 동작하기 때문에 스프링 MVC 와 분리되어 관리 및 동작합니다.
-
참고로 스프링 시큐리티 3.2부터는 XML로 설정하지 않고 자바 config 설정으로 간단하게 설정할 수 있도록 지원하고 있습니다.
자주 사용하는 보안 용어
-
접근 주체(Principal): 보호된 대상에 접근하는 유저 인증(Authentication): 인증은 ‘증명하다’라는 의미로 예를 들어, 유저 아이디와 비밀번호를 이용하여 로그인 하는 과정 을 말합니다.인가(Authorization): ‘권한부여’나 ‘허가’와 같은 의미로 사용됩니다. 즉, 어떤 대상이 특정 목적을 실현하도록 허용(Access) 하는 것을 의미합니다.권한: 인증된 주체가 애플리케이션의 동작을 수행할 수 있도록 허락되었는지를 결정할 때 사용합니다.
스프링 시큐리티 필터(Spring Security Filter)
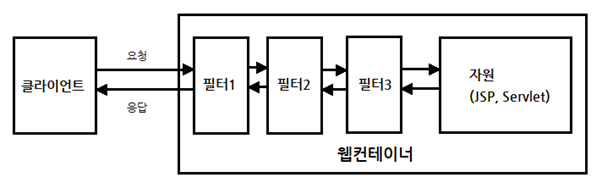
클라이언트(보통 브라우저)가 요청을 보내면, 그 요청을 서블릿이나 JSP등이 처리하게 됩니다. 스프링 MVC에서는DispatcherServlet이 요청을 가장 먼저 받게 되는데, 이 DispatcherServlet이 요청 받기 전에 다양한 필터들이 있을 수 있습니다.
필터가 하는 역할은 클라이언트와 자원 사이에서 요청과 응답 정보를 이용해 다양한 처리를 하는데 목적이 있습니다. 어떤 필터는 요청을 받은 후, 클라이언트가 원래 요청한 자원이 아닌 다른 자원으로 리다이렉트 시킬 수도 있습니다. 어떤 필터는 다음 필터에게 요청과 응답을 전달하지 않고, 바로 클라이언트에게 응답하고 끝낼 수도 있습니다.
스프링 시큐리티는 다양한 기능을 가진 필터들을 10개 이상 기본적으로 제공합니다. 이렇게 제공되는 필터들을 Security Filter Chain(시큐리티 필터 체인)이라고 말합니다.
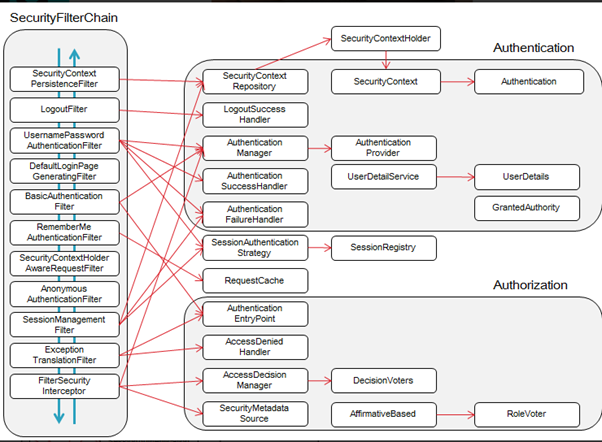
위의 그림은 시큐리티 필터 체인과 각각의 필터에서 사용하는 객체들(Repository, Handler, Manager등)에 대해 잘 표현하고 있습니다.
SecurityContextPersistenceFilter:SecurityContextRepository에서SecurityContext를 가져오거나 저장하는 역할을 합니다.LogoutFilter: 설정된 로그아웃 URL로 오는 요청을 감시하며, 해당 유저를 로그아웃 처리(UsernamePassword)AuthenticationFilter: (아이디와 비밀번호를 사용하는 form 기반 인증) 설정된 로그인 URL로 오는 요청을 감시하며, 유저 인증 처리AuthenticationManager를 통한 인증 실행- 인증 성공 시, 얻은
Authentication객체를SecurityContext에 저장 후AuthenticationSuccessHandler실행 - 인증 실패 시,
AuthenticationFailureHandler실행
DefaultLoginPageGeneratingFilter: 인증을 위한 로그인폼 URL을 감시합니다.BasicAuthenticationFilter: HTTP 기본 인증 헤더를 감시하여 처리합니다.RequestCacheAwareFilter: 로그인 성공 후, 원래 요청 정보를 재구성하기 위해 사용됩니다.SecurityContextHolderAwareRequestFilter:HttpServletRequestWrapper를 상속한SecurityContextHolderAwareRequestWapper클래스로HttpServletRequest정보를 감쌉니다.SecurityContextHolderAwareRequestWrapper클래스는 필터 체인상의 다음 필터들에게 부가정보를 제공합니다.AnonymousAuthenticationFilter: 이 필터가 호출되는 시점까지 사용자 정보가 인증되지 않았다면 인증토큰에 사용자가 익명 사용자로 나타납니다.SessionManagementFilter: 이 필터는 인증된 사용자와 관련된 모든 세션을 추적합니다.ExceptionTranslationFilter: 이 필터는 보호된 요청을 처리하는 중에 발생할 수 있는 예외를 위임하거나 전달하는 역할을 합니다.FilterSecurityInterceptor: 이 필터는AccessDecisionManager로 권한부여 처리를 위임함으로써 접근 제어 결정을 쉽게 해줍니다.
스프링 시큐리티 인증관련 아키텍처
아이디와 암호를 입력했을 때 이를 처리하는 필터는 AuthenticationFilter입니다. 해당 필터는 다음 그림과 같은 순서로 동작합니다.
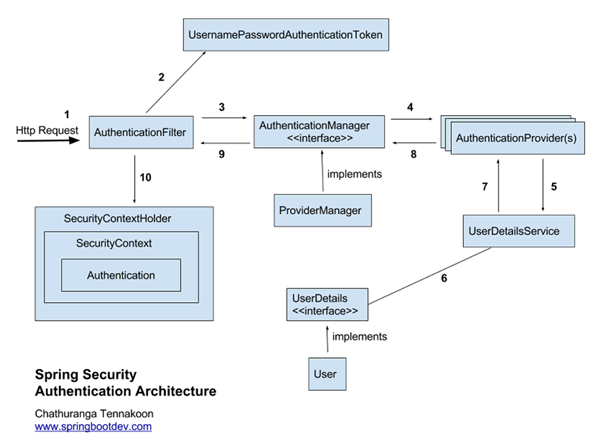
- 클라이언트(유저)가 로그인을 시도합니다.
AuthenticationFilter는AuthenticationManager, AuthenticationProvider(s), UserDetailsService를 통해 DB에서 사용자 정보를 읽어옵니다. 여기서 중요한 것은UserDetailsService가 인터페이스라는 것입니다. 해당 인터페이스를 구현한 빈(Bean)을 생성하면 스프링 시큐리티는 해당 빈을 사용하게 됩니다. 즉, 어떤 데이터베이스로 부터 읽어들일지 스프링 시큐리티를 이용하는 개발자가 결정할 수 있게 됩니다.UserDetailsService는 로그인한 ID에 해당하는 정보를 DB에서 읽어들여UserDetails를 구현한 객체로 반환합니다. 프로그래머는UserDetails를 구현한 객체를 만들어야 할 필요가 있을 수 있습니다.UserDetails정보를 세션에 저장하게 됩니다.- 스프링 시큐리티는 인메모리 세션저장소인
SecurityContextHolder에UserDetails정보를 저장하게 됩니다. - 클라이언트(유저)에게
session ID(JSESSION ID)와 함께 응답을 하게 됩니다. - 이후 요청에서는 요청 쿠키에서
JSESSION ID정보를 통해 이미 로그인 정보가 저장되어 있는 지 확인합니다. 이미 저장되어 있고 유효하면 인증 처리를 해주게 됩니다.
예제
프로젝트는 아래의 그림과 같은 구조로 이루어져 있습니다.
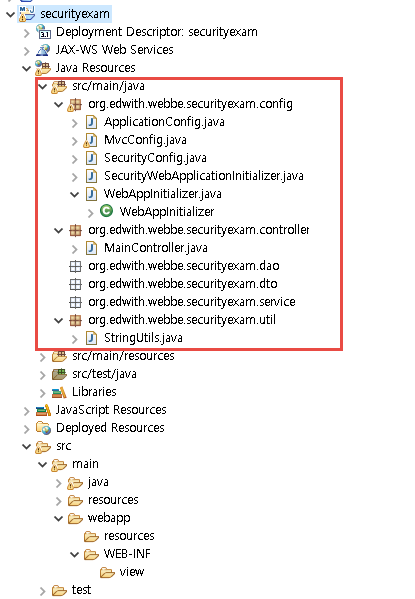
WebAppInitializer.java: web.xml 또는 web.xml파일을 대신하는 자바 Config설정 파일ApplicationConfig.java: 스프링 설정파일MvcConfig.java: 스프링 MVC설정파일SecurityWebApplicationInitializer.java: 스프링 시큐리티 설정파일SecurityConfig.java: 스프링 시큐리티 설정파일
웹 어플리케이션 설정 파일
pom.xml
Security를 사용하기 위한 라이브러리를 추가해줍니다.
<?xml version="1.0" encoding="UTF-8"?>
<project xmlns="http://maven.apache.org/POM/4.0.0"
         xmlns:xsi="http://www.w3.org/2001/XMLSchema-instance"
         xsi:schemaLocation="http://maven.apache.org/POM/4.0.0
		http://maven.apache.org/xsd/maven-4.0.0.xsd">
    <modelVersion>4.0.0</modelVersion>
    <groupId>org.edwith.webbe</groupId>
    <artifactId>securityexam</artifactId>
    <version>0.0.1-SNAPSHOT</version>
    <packaging>war</packaging>


    <properties>
    <!-- eclipse에서 웹 어플리케이션 프로젝트 작성시 web.xml파일을 작성하지 않고 java-config로 설정할 경우 아래의 설정이 있어야 합니다.-->
        <failOnMissingWebXml>false</failOnMissingWebXml>
        <!-- spring 5.2.3이 나오는 시점에 spring security는 5.2.2가 최신버전이라서 5.2.2.RELEASE로 설정함 -->
        <spring.version>5.2.2.RELEASE</spring.version>
    </properties>

    <dependencies>
        <!-- servlet-api이다. tomcat에 배포될 경우엔 사용되지 않도록 하기 위해서 scope를 provided로 설정하였다. -->
        <dependency>
            <groupId>javax.servlet</groupId>
            <artifactId>javax.servlet-api</artifactId>
            <version>3.1.0</version>
            <scope>provided</scope>
        </dependency>

        <!-- jsp-api이다. tomcat에 배포될 경우엔 사용되지 않도록 하기 위해서 scope를 provided로 설정하였다. -->
        <dependency>
            <groupId>javax.servlet.jsp</groupId>
            <artifactId>javax.servlet.jsp-api</artifactId>
            <version>2.3.2-b02</version>
            <scope>provided</scope>
        </dependency>

        <!-- jstl은 tomcat이 기본 지원하지 않는다. 그렇기 때문에 tomcat에도 배포가 되야 한다.-->
        <dependency>
            <groupId>javax.servlet</groupId>
            <artifactId>jstl</artifactId>
            <version>1.2</version>
        </dependency>

        <!-- spring webmvc에 대한 의존성을 추가한다. spring webmvc에 대한 의존성을 추가하게 되면 spring-web, spring-core등이 자동으로 의존성이 추가된다.-->
        <dependency>
            <groupId>org.springframework</groupId>
            <artifactId>spring-webmvc</artifactId>
            <version>${spring.version}</version>
        </dependency>

        <!-- java 9 이상에서 추가해줘야 합니다. @PostConstruct 등을 사용하려면 필요함-->
        <dependency>
            <groupId>javax.annotation</groupId>
            <artifactId>javax.annotation-api</artifactId>
            <version>1.3.2</version>
        </dependency>
        <dependency>
            <groupId>junit</groupId>
            <artifactId>junit</artifactId>
            <version>4.12</version>
            <scope>test</scope>
        </dependency>

        <dependency>
            <groupId>org.springframework</groupId>
            <artifactId>spring-test</artifactId>
            <version>${spring.version}</version>
        </dependency>

        <!-- Spring Security Core -->
        <dependency>
            <groupId>org.springframework.security</groupId>
            <artifactId>spring-security-core</artifactId>
            <version>${spring.version}</version>
        </dependency>

        <!-- Spring Security Config -->
        <dependency>
            <groupId>org.springframework.security</groupId>
            <artifactId>spring-security-config</artifactId>
            <version>${spring.version}</version>
        </dependency>

        <!-- Spring Security Web -->
        <dependency>
            <groupId>org.springframework.security</groupId>
            <artifactId>spring-security-web</artifactId>
            <version>${spring.version}</version>
        </dependency>

        <!-- Spring Security JSP Custom Tags -->
        <dependency>
            <groupId>org.springframework.security</groupId>
            <artifactId>spring-security-taglibs</artifactId>
            <version>${spring.version}</version>
        </dependency>


    </dependencies>

    <build>
        <plugins>
            <plugin>
                <artifactId>maven-compiler-plugin</artifactId>
                <version>3.7.0</version>
                <configuration>
                    <source>1.8</source>
                    <target>1.8</target>
                    <encoding>utf-8</encoding>
                </configuration>
            </plugin>
        </plugins>
    </build>

</project>
WebAppInitializer.java
AbstractAnnotationConfigDispatcherServletInitializer에 대한 설명은
WebApplicationInitializer / AbstractAnnotationConfigDispatcherServletInitializer 포스팅 에서 볼 수 있습니다.
package org.edwith.webbe.securityexam.config;

import org.springframework.web.filter.CharacterEncodingFilter;
import org.springframework.web.servlet.support.AbstractAnnotationConfigDispatcherServletInitializer;

import javax.servlet.*;

public class WebAppInitializer extends AbstractAnnotationConfigDispatcherServletInitializer {
    // Spring Config 파일을 설정합니다.
    @Override
    protected Class<?>[] getRootConfigClasses() {
        return new Class<?>[]{ApplicationConfig.class, SecurityConfig.class};
    }

    // Spring WEB Config 파일을 설정합니다. WebConfig는 Bean을 RootConfig에서 설정한 곳에서부터 찾습니다.
    @Override
    protected Class<?>[] getServletConfigClasses() {
        return new Class<?>[]{MvcConfig.class};
    }

    /*
    getServletMapping()은 DispatcherServlet이 매핑되기 위한 하나 혹은 여러 개의 패스를 지정합니다.
   위의 코드에서는 애플리케이션 기본 서블릿인 /에만 매핑이 되어 있습니다. 그리고 이것은 애플리케이션으로 들어오는 모든 요청을 처리합니다.
   원래 서블릿에서는 / 을 처리하는 DefaultServlet이 설정되어 있습니다.
     */
    @Override
    protected String[] getServletMappings() {
        return new String[]{"/"};
    }

    /*
    필터를 설정합니다.
     */
    @Override
    protected Filter[] getServletFilters() {
        CharacterEncodingFilter encodingFilter = new CharacterEncodingFilter();
        encodingFilter.setEncoding("UTF-8");

        return new Filter[]{encodingFilter};
    }
}
ApplicationConfig.java
package org.edwith.webbe.securityexam.config;

import org.springframework.context.annotation.ComponentScan;
import org.springframework.context.annotation.Configuration;

// 레이어드 아키텍처에서 Controller가 사용하는 Bean들에 대해 설정을 합니다.
// dao, service를 컴포넌트 스캔하여 찾도록 합니다.
@Configuration
@ComponentScan(basePackages = {"org.edwith.webbe.securityexam.dao", "org.edwith.webbe.securityexam.service"})
public class ApplicationConfig{

}
MvcConfig.java
package org.edwith.webbe.securityexam.config;

import org.springframework.context.annotation.ComponentScan;
import org.springframework.context.annotation.Configuration;
import org.springframework.web.servlet.config.annotation.*;

@Configuration
@EnableWebMvc
@ComponentScan(basePackages = {"org.edwith.webbe.securityexam.controller"})
public class MvcConfig implements WebMvcConfigurer {

	// default servlet 핸들러를 설정합니다.
	// 원래 서블릿은 / (모든 요청)을 처리하는 default servlet을 제공합니다.
	// 스프링에서 설정한 path는 스프링이 처리하고, 스프링이 처리하지 못한 경로에 대한 처리는 디폴트 서블릿에게 전달하여 처리하게 됩니다.
	@Override
	public void configureDefaultServletHandling(DefaultServletHandlerConfigurer configurer) {
		configurer.enable();
	}

	// Spring MVC에서 jsp view 가 위치하는 경로를 설정합니다.
	@Override
	public void configureViewResolvers(ViewResolverRegistry registry) {
		registry.jsp("/WEB-INF/view/", ".jsp");
	}

    // '/' 로 요청이 오면 '/main'으로 리다이렉트 하도록 합니다.
	@Override
	public void addViewControllers(ViewControllerRegistry registry) {
		registry.addRedirectViewController("/", "/main");
	}

    // /resources 경로에 있는 자료들을 /resources/**로 접근하게 합니다.
	@Override
	public void addResourceHandlers(final ResourceHandlerRegistry registry) {
		registry.addResourceHandler("/resources/**").addResourceLocations("/resources/");
	}
}
SecurityWebApplicationInitializer.java
스프링 시큐리티를 사용하려면 AbstractSecurityWebApplicationInitializer를 상속받는 클래스를 반드시 작성해주셔야 합니다. AbstractSecurityWebApplicationInitializer를 상속받는 클래스가 있을 경우 스프링 시큐리티가 제공하는 필터들을 사용할 수 있도록 활성화 해줍니다.
package org.edwith.webbe.securityexam.config;

import org.springframework.security.web.context.AbstractSecurityWebApplicationInitializer;

/*
   AbstractSecurityWebApplicationInitializer를 상속받는 클래스를 작성해야 스프링 시큐리티 필터들이 활성화됩니다.
 */
public class SecurityWebApplicationInitializer extends AbstractSecurityWebApplicationInitializer {
}
SecurityConfig.java
package org.edwith.webbe.securityexam.config;

import org.springframework.context.annotation.Bean;
import org.springframework.context.annotation.Configuration;
import org.springframework.security.config.annotation.web.builders.HttpSecurity;
import org.springframework.security.config.annotation.web.builders.WebSecurity;
import org.springframework.security.config.annotation.web.configuration.EnableWebSecurity;
import org.springframework.security.config.annotation.web.configuration.WebSecurityConfigurerAdapter;
import org.springframework.security.crypto.bcrypt.BCryptPasswordEncoder;
import org.springframework.security.crypto.password.PasswordEncoder;

@Configuration
@EnableWebSecurity
public class SecurityConfig extends WebSecurityConfigurerAdapter {

    //   /webjars/** 경로에 대한 요청은 인증/인가 처리하지 않도록 무시합니다.
    @Override
    public void configure(WebSecurity web) throws Exception {
        web.ignoring().antMatchers(
                "/webjars/**");
    }

    //   /, /main에 대한 요청은 누구나 할 수 있지만,
	//   그 외의 요청은 모두 인증 후 접근 가능합니다.
    @Override
    protected void configure(HttpSecurity http) throws Exception {
        http
                .csrf().disable()
                .authorizeRequests()
                .antMatchers("/", "/main").permitAll()
                .anyRequest().authenticated();
    }

    // 패스워드 인코더를 빈으로 등록합니다. 암호를 인코딩하거나,
    // 인코딩된 암호와 사용자가 입력한 암호가 같은 지 확인할 때 사용합니다.
    @Bean
    public PasswordEncoder encoder() {
        return new BCryptPasswordEncoder();
    }
}
스프링 시큐리티를 이용해 로그인/로그아웃/인증/인가 등을 처리하기 위한 설정 파일입니다.
@EnableWebSecurity가 붙어 있을 경우 스프링 시큐리티를 구성하는 기본적인 빈(Bean)들을 자동으로 구성해줍니다.
WebSecurityConfigurerAdapter를 상속받으면, 특정 메소드를 오버라이딩 함으로써 좀 더 손쉽게 설정할 수 있습니다.
public void configure(WebSecurity web) 메소드를 오버라이딩 하는 이유는 인증/인가가 필요 없는 경로를 설정할 필요가 있기 때문입니다. 해당 메소드는 스프링 시큐리티 설정이 자동으로 호출이 되는데, 이때 WebSecurity객체를 파라미터로 넣어주게 됩니다.
해당객체의 ignoring()메소드에 무시될 경로를 지정하면 됩니다. 여기에서는 "/webjars/"를 설정하였습니다.
자바 개발 도구 중에
ant라는 도구가 있습니다. Maven처럼 프로젝트를 빌드할 때 사용하는 도구인데, Maven이전에 널리 사용되던 도구였습니다. 이ant에서 사용하는 표기법 중에"/경로/"와 같은 형식이 있습니다.""는 특정 경로 이하의 모든 것을 의미합니다. 즉,"/webjars/"로 시작하는 모든 경로를 무시하라는 의미입니다.
protected void configure(HttpSecurity http) 메소드를 오버라이딩 한다는 것은 인증/인가에 대한 설정을 한다는 의미입니다. 가장 중요한 메소드라고 말할 수 있습니다.
http.csrf().disable()는 csrf()라는 기능을 끄라는 설정입니다. csrf는 보안 설정 중 post방식으로 값을 전송할 때 token을 사용해야하는 보안 설정입니다. csrf은 기본으로 설정되어 있는데, csrf를 사용하게 되면 보안성은 높아지지만 개발초기에는 불편함이 있다는 단점이 있습니다. 그래서 csrf 기능을 끄도록 한 것입니다. disable()메소드는 http(여기에선 HttpSecurity)를 리턴합니다.
이말은 disable().authorizeRequests()는 http.authoriazeRequests()와 같은 의미를 가집니다.
http.authorizeRequests()
                .antMatchers("/", "/main").permitAll()
                .anyRequest().authenticated();
위의 설정은 "/"와 "/main" 경로는 누구나 접근(permitAll())할 수 있도록 한 것이며
그외의 경로는 인증을 한 후에만 접근할 수 있다는 것을 의미합니다.
보안 설정 테스트를 위한 컨트롤러 클래스
기본적인 보안 설정을 했다면, 실제로 잘 동작하는지 테스트하기 위한 컨트롤러를 작성해 보도록 하겠습니다. 아래의 MainController는 2개의 path를 처리하고 있습니다. 참고로
2개의 path는 각각 "/main"과 "/securepage"입니다. 앞에서 "/main"은 누구나 접근할 수 있다고 했었습니다. "/"과 "/main"을 제외하면 모두 인증 후에 사용한다고 설정되어 있었습니다.
MainController.java
@ResponseBody 어노테이션이 붙어있을 경우엔 리턴하는 문자열을 화면에 직접 출력하게 됩니다. 만약, @ResponseBody 어노테이션이 없을 때는 뷰(View)이름을 리턴합니다.
package org.edwith.webbe.securityexam.controller;

import org.springframework.stereotype.Controller;
import org.springframework.web.bind.annotation.RequestMapping;
import org.springframework.web.bind.annotation.ResponseBody;

@Controller
public class MainController {
    @RequestMapping("/main")
    @ResponseBody
    public String main(){
        return "main page";
    }

    @RequestMapping("/securepage")
    @ResponseBody
    public String securitypage(){
        return "secure page";
    }
}
실행
앞에서 작성한 컨트롤러 메소드가 호출되도록 브라우저를 열고 URL을 입력합니다.
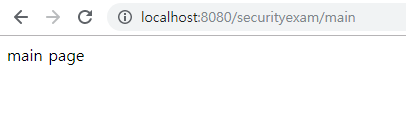
http://localhost:8080/securityexam/main 을 실행하면 아래의 그림과 같이 잘 표시되는 것을 알 수 있습니다.
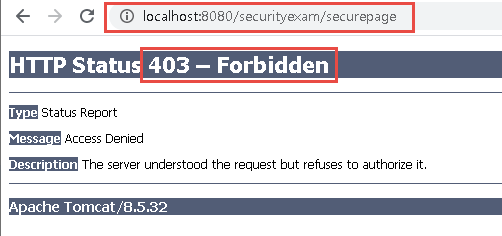
http://localhost:8080/securityexam/securepage 를 요청해보면, 응답 상태 코드가 403이 온 것을 알 수 있습니다. 응답 상태 코드가 403이 왔다는 것은 해당 경로는 인증을 거친 후에만 접근을 해야 한다는 것을 의미합니다.
참고 : https://www.boostcourse.org/web326/lecture/58997?isDesc=false
https://www.boostcourse.org/web326/lecture/58998?isDesc=false
댓글남기기